It has inspired me to finally try OpenSCAD, and I’ve started to put together a parametric version of this: https://u.ale.sh/braunscadv1.png
Not really ready for primetime yet, just wanted to share :-)
EDIT: a quick question: would you be open to sharing your version under a more permissive license? I’d love to reuse some details if you don’t mind, but I’m not sure if I can do that with the current terms.
Curious if you got a response as I'd love a parameterized version of this design. I have the original Overwork+Scott version on my bedside, but I'd much prefer a storage space than a charger there.
To build atop of OP's response, the Bambu Lab line of printers are much higher quality than some older printers. I have 3 different ones, and I also just pull them off the build plate and begin using them.
Many modern printers also give similar results, but may require a bit of tuning. Also it's as much about the settings in your slicer software, and most current ones have evolved to have great defaults and are easily tweaked.
I'm potentially in the market for a 3d printer for our office. Mostly for one offs and some prototyping, and we don't necessarily need one but more a wouldn't-it-be-nice kinda thing. The Bambu Lab printers look like they could fit our needs/wants really well, but I'd love to do a bit of compare and contrast before placing an order. Are there any buyer's guides out there you would recommend for hobbyists such as us?
Totally agree, I used to muck about with a couple Creality ones and was totally spending much more time tinkering with the printer than actually printing.
Got an A1 mini in the recent sale and it's been so refreshing being able to just focus on what I actually want to do, which is printing stuff.
- print quality and speed is similar (new MK4S seems to be a bit better)
- Bambu's design life is much shorter (Prusas are fully repairable with parts stocked in the online shop, and every new version release includes upgrade kits for old models)
- the amount of effort/babysitting is similar
- reliability seems higher on Prusa's side (no wonder, given that they print parts of the printer on the printers themselves on industrial scale)
Also, if this matters to you, Bambu behaviour (like patenting opensource designs they didn't invent [1] and hostile competitive intelligence [2]) seems quite problematic.
I have a Prusa i3 MK3S+, used it for years, a recent Prusa XL, a Bambu X1C and a Bambu A1 mini. I would pick a Bambu any day, except if you need large prints and need the XL's area/volume. Otherwise the Bambu printers are quite simply better on every possible metric.
I think prusa have been resting on their laurels and fallen very far behind. Bambu sort of raised the bar with their printers and the price points they are offered at. They took much of the tinkering out of the equation that filtered most people from producing quality prints.
If you're working with more exotic or engineering materials, it can still require a bit of work to dial in. But the most common like PLA, ABS, PETG will print without issue.
That's very unfortunate, as I do value open source hardware. However, I value my time more, and Pruša have become complacent and released incremental updates (most of their printers aren't even CoreXY), so Bambu turned up and are eating Pruša's lunch.
I don't think there's much inherent value in the CoreXY geometry. MK4S seems to outperform everything Bambu has both on speed and on quality (especially on overhangs and dimensional precision) despite being a bed slinger.
On the other hand, continuing the bed slinger line let Prusa provide an upgrade path for existing printers.
Forum comments have been the best resource for me. (Followed by joining the printer’s users’ Facebook group to see what sort of issues are most common).
The top SEO’d buyers guide websites are pretty useless in my experience.
That said, having owned a dozen different printers for my own business’s prototyping work, the Bambu labs are truly fantastic. I retired 3 ultimaker S7s for 2 X1 Carbons and haven’t looked back. The Bambu labs legitimately print 3-4x faster and have as good if not better surface finish. AMS system is ingenious. Only thing I did was x-y squareness/skew compensation so both printers make the same sized parts (the printers aren’t perfectly square from the factory). There are guides on how to use M1005 gcode command.
+1 for BambuLab printers. I have an X1C and finally I can work with the printer, not work on the printer. Get an X1E if you have special materials you want to print and/or want an entirely hardwired connection to the printer from the network.
Even the cheapest 3D printers have generally gotten really good recently... I have a new (lower end) Creality Ender V3 SE printer, and it makes perfectly clean prints like this out of the box if you use their own brand of filament and settings they've tuned for it- and it will do so on any new filament if you take the time to figure out the right settings.
On the finishing:
“Of course because I 3D Printed it with a PLA filamanet, it's not as shiny and glossy compared to actuall electronic devices. People use acetone and various solutions to make it shiny.”
The acetone (vapour) approach only works on ABS and is pretty nasty. For PLA your best bet is sanding. You could add some putty to make it a bit easier and get better results. You will then also need to paint it. All in all if the print quality is good enough best stick with that.
XTC 3D is expensive for manufacturing but is really good for these hobbyist projects. It’s really too pricey to do actual production runs with but the results are great if you’re just making something for yourself at home.
If you’re using a color that already has a decent amount of yellow in it or don’t mind the yellowing polyurethane and spar-urethane are also decent finishing options. They won’t work on colors like white though, obviously. Even grey is probably going to see a little too much yellowing from those.
With overhangs/bridges, you eventually get into the habit of just trying to design a part so you can avoid that. Sometimes, of course, it is unavoidable. But it is quite strange and nice how your brain starts to just morph use cases into a shape and orientation that makes it easily printable after you've been thinking in the problem space for awhile. Eventually you just end up baking up creative printing solutions that try to avoid the need for supports entirely where possible because introducing supports introduces so many downsides from not only the material cost, but also the aesthetics, time, and frustration perspective as well.
XTC is a good solution for some use cases, and quite bad for others, as outlined above. For the use case in the OP, probably it would be quite nice. That use case is one that is hobbyist level of output in terms of number of units generated but also one where aesthetics are quite important if not fundamental to the overall design. For this kind of use case XTC is a good fit.
The one other thing to consider, if you design to use stuff like XTC and even the urethanes I mention above, is that obviously it takes up some amount of space. So you have to factor that into the design. Probably what I would do is take my boundaries from the original design and increase the tolerance by maybe 1mm or so for the extra space the finishing agent will take up. Because I highly suspect that if you applied XTC to the dock in the OP that the phone would no longer fit after that due to the tight tolerances in the design without that adjustment.
I have a Bambu P1S, and I'm fairly sure the prints would look worse after sanding than before. I just use them all as they are, straight out of the printer, and they always look amazing.
The primary thing people complain about is the aesthetics of the FDM print lines. They give the appearance of a hobbyist look. Sanding and finishing is one way to alleviate that. I bet PLA doesn’t sand amazing since it’s mostly just sugar but PETG sands reasonably fine. I have sanded PETG and finished with spar urethane/polyurethane for commercial products to give them a nice professional glossy sheen with no print lines. I mentioned in a sibling comment XTC-3D as another option which is probably the best hobbyist product for this, but it’s kind of a pain to work with and it’s a little expensive. So not great for commercial use. For home use though it’s totally fine and indeed usually gives better results than the urethanes mentioned above due to lack of yellowing and being thicker and better at filling in the lines and giving a smoother appearance. People could honestly probably just use that product without sanding and be mostly happy with it because it does a good job of hiding the FDM lines even without sanding
We run one of the largest print farms in North America. Reflecting parent's sentiment, BambuLabs' P1/X1 series are capable of substantially finer layer height and consistency (0.08mm), with SLA-quality results. We dumped all of our FormLabs because of it.
We don't sand any PLA, anymore. If we need to control the surface texture, it's largely a function of the qualities of the filament and print speed.
Great to hear. I have a resin printer at home and almost never use it because it’s such a messy, sketchy (in terms of chemicals) pain to deal with. The fact that FDM is good enough now for a lot of aesthetics use cases is great. I’ll probably still have to reach for the resin printer for high pressure use cases (like injection molds) but the fact that FDM can do more than before and make commercial grade parts is really good news
The physical characteristics of the print surface also change at lower layer height with high infill. I wonder if that might be good for your use case.
I'm mentioning it because we were surprised how easily our molds separated when we moved to Bambu and didn't understand why. It turned out that the combination of the layer height and high print speed that gave the prints their smooth, matte finish with standard PLA also made them functionally non-stick.
We also discovered they're also at least tough enough for a car to drive over, which may have just been because of the thickness. I also sometimes print nylon and polycarbonate automotive parts for a mechanic which seem to have excellent rigidity and durability.
Indeed I suspect FDM is good enough for a significant hunk of use cases as you’re outlining.
As FDM printing evolves the number of use cases it cannot solve seems to be shrinking. Probably we need to get into physics requirements to cover the requirements that FDM does not solve these days. Which is great, it makes general plastics manufacturing super accessible to the masses when we can arrive at this. I wish there was a general FAQ thing available people would be able to use to determine what manufacturing process would be necessary at the product planning phase. Because I feel like if people knew that they could just 3D print plastics at scale that a lot more people would be willing to innovate in the hardware space, which is a space well known as being difficult to enter and fraught with all sorts of monetary and regulatory land mines.
In my experience matte filaments hide the layer lines much better. Between that and the overall quality of recent printers like the Bambu or the Prusa Mk4, I don’t find the need to do any post processing.
I do want to challenge you on this. I don’t have evidence matte filaments are better. I would love to see an example of these filaments outperforming. I believe it is true, but would love to see a demonstration!
It isn’t really that they’re better as filaments, it’s just that the matte nature makes them less reflective and therefore you don’t see the layer lines as much.
Performance wise, most matte filaments are more brittle and have worse layer adhesion due to the matting pigment, but do a good job at hiding lines as the reduction in specular highlights reduce the visibility of them. Another good trick is fuzzy skin setting with both length and depth settings at 0.4x-0.8x layer height.
For PPE: an effective respirator is not that expensive, should be wearing them and safety glasses for sanding as well. Only extra PPE you really need for acetone smoothing is some nitrile / latex gloves, and those are fairly standard in shop / art environments anywho.
Also, MEK, Methyl Ethyl Ketone, apparently smooths PLA out quite well too, but if you can print in ABS I would already be doing that for finished products anywho.
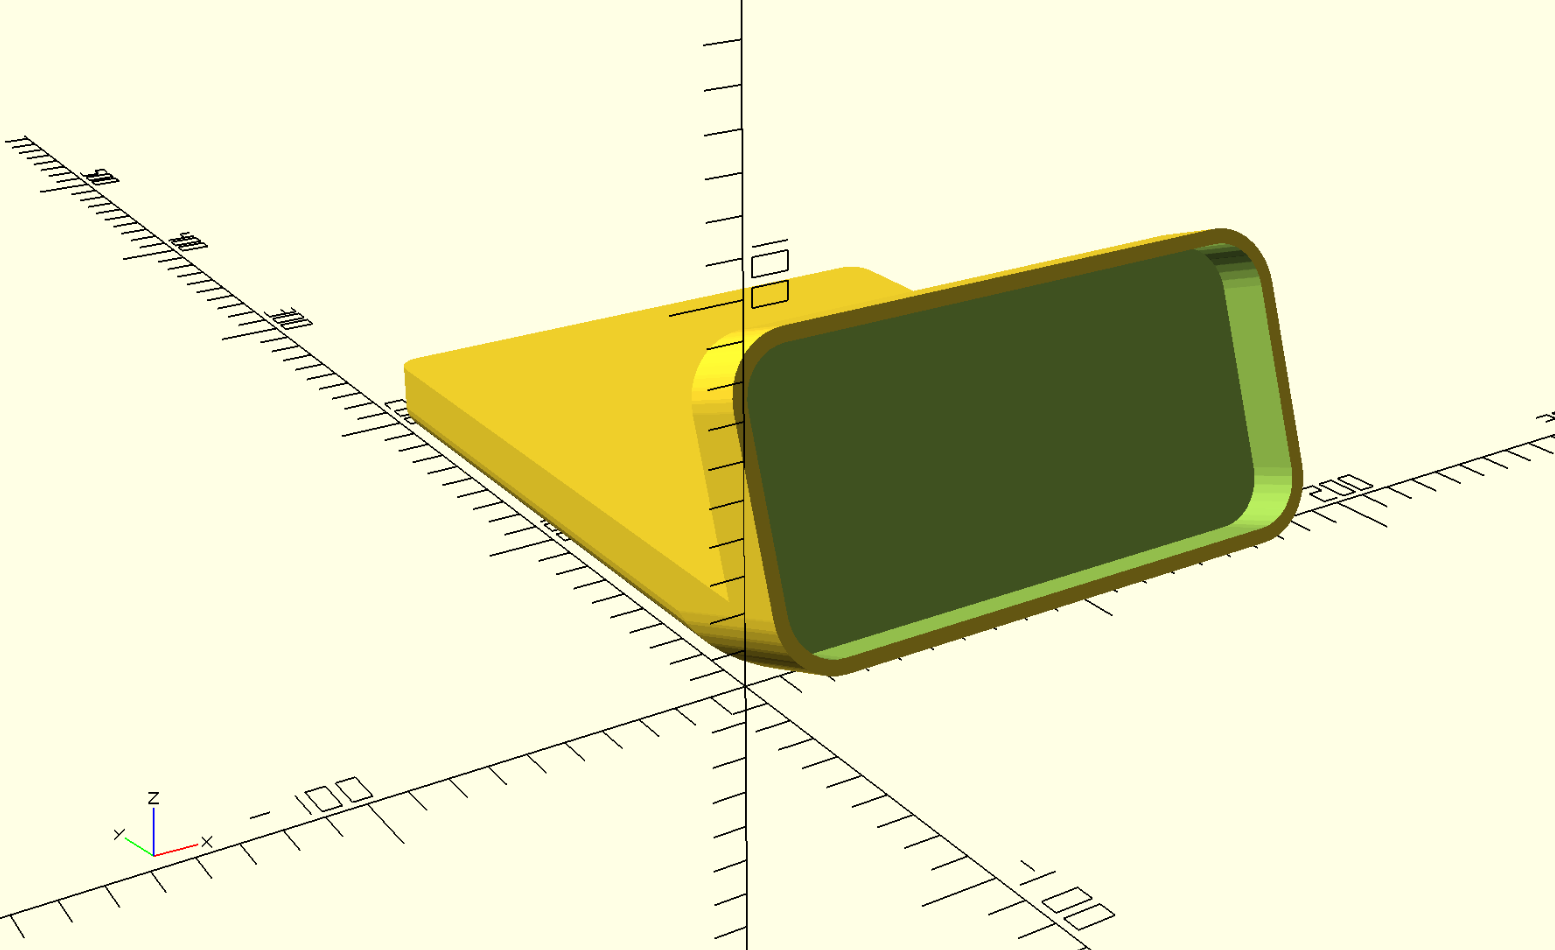
Question: Most docks have ample space around the phone to grip it and remove it from the dock easily. Your design encases the phone on every side. How do you get the phone out in the morning?
In theory, with parametric design (eg OpenSCAD, Autodesk Inventor, etc) a model could allow you to enter the phone dimensions and it automatically re-calculates the correct geometry.
In practice, experience says doing this (in a robust way) is a lot harder than it sounds. ;)
It's not really that much harder, as long as you know which dimensions you want to be variable from the start. Going back and changing everything after the fact is a massive pain.
I think it's doable with a parametric design in Fusion but it is definitely more work up-front or re-work after you have a working version. Getting a well parameterized and set of constrained sketches can be a time consuming process since I don't do it every day. It's probably the part I've struggled with the most in making 3D printable designs (I'm not OP but design cosplay props for my kids) since I don't always know what I want the final dimensions to be.
How’s the weight of it when the phone isn’t docked? Perhaps you could add an insert for a steel plate on the bottom so it has a nice feel when the phone isn’t docked?
It's not a lot, because I printed it with an infill of 10%. You can increase it, and make it around 40% or 50%. Some people also use sands to make it heavy. For now it doesn't bother me and I think because I'm putting other things on top of the tray, it doesn't move around easily.
It can be a bit painful to get hold of, but I’ve been experimenting with micro-suction sheets, which allows you to “stick” things down to smooth surfaces, without adhesives (the material surface is full of tiny pores that act as millions of mini suctions cups). And allows you to easily remove, and re-stick them later without leaving any goop behind.
It’s a nice way to stop these types of 3D prints from sliding around in surfaces, without having to resort to weights or lead shot, which it way more painful to integrate that you would expect.
I'd watch Superfastmatt's latest video on the subject, although I think there is one competitor in particular that is supposed to be a similarly good experience.
Because the STEP file has higher fidelity and can be edited as more or less common primitives. The 3MF file is just a bunch of triangles wrapped in print settings (it’s literally a ZIP with the STL inside, which is, in itself, the aforementioned bunch of triangles).
Shapr3D can import and export pretty usable STEP files.
Product designers are mostly on Instagram and YouTube unfortunately. It's rare for people to write like me. But /r/IndustrialDesign(er) and /r/Design are good places for written communication.
Thanks a lot for your support. A friend and I looked into the economics, but the lowest company willing to print was around $63. If you know of any services that provide 3D printing, I am happy to look into it.
I haven't downloaded your model but https://www.i-solids.com/ (US-based, FDM and MJF) and https://www.weerg.com/ (Italy, mostly MJF ) will both do instant quotes and you might get reasonable prices from them at scale. PCBWay and JLCPCB in China will also do 3d printing at reasonable volume, if you want to get an idea of a baseline price.
Competing products such as the Nomad stand, Zen, Courant tray are $100-140. I happily paid for each.
The design and high quality materials were worth it to me for the same reasons you wanted this design — it is functional art and doesn’t look out of place next to my other quality items I see and use daily.
I could see paying $120 for this dock. I bet this is the kind of thing that would succeed on Kickstarter. Sure, I could print and assemble it myself but that would cost me more than $120 in parts and labor.
I believe they want a minimum order of $1000 and only allow me to print it in a single color. Honestly, providing a physical good is a whole other set of issues with which I have no experience at all.
It looked like his design incorporated space for a standard case.
Actually, without a case I think there might be an interesting edge detail.
That wouldn't affect functionality, and look cool too!
I use a case for grip, not for the protection it provides. I'd be dropping this slippery device pretty often otherwise. I haven't been able to go case-less since the days of the iPhone 4.
> Apple fixes or replaces it for free
Where? In the US they charge $29 and up for repair with AppleCare+. $29 for the screen, $29 more if you damage the glass on the back too. $99 if you damage the camera or anything else that requires replacing the phone altogether.
HN revolves around YComb and finding ideas that make great products. Someone has come up with a brilliant solution and someone else is saying they want to buy it. HN isn’t about “hacker” purity, it’s about thinking through cool ideas and maybe finding a startup along the way.
Building your own, idk, mechanical keyboard? Hackerish thing to do, sure. But buying someone else's cool design is not against "the ethos", that's a silly thing to say. Supporting artisans in their craft is Good, actually, I don't see anything about this design which make it different that way.
that's a weird notion of hacker purity. did you write your own kernel and compiler and web browser, on your own CPU that you built from transistors you made in your parents garage? and then connected to an Internet of your own creation? or did you "outsource" some part of that process to others?
I did all my CAD work via https://www.shapr3d.com/. It runs on multiple platforms, but I use it on my iPad Pro. There are many other options, such as OnShape, Fusion, FreeCad etc.. However most of them have their own quirks
Onshape: It's public domain on Hobbyist plan, so anything I create has to be by default Public. The next plan they have is $1500 yearl
Fusion: This is the most recommended one, however it's macOS and Windows only. Their Hobbyist plan is pretty generous, but the UI is very slow on macOS and it doesn't have an iPad app.
For me, the iPad Pro is a huge enabler. I don't want to sit down in front of my MacBook because I already work the whole day. Second, with the Apple Pencil it's so much easier and intuitive compared to anything else.
The only ceveat with Shapr3D is the cost. I paid for the yearly subscription, which was around $299. And it's the cheapest of all of them btw.
If you're in Shapr3D you should change all your radii and fillets to "G2" in stead of G1.*
Currently all your corners (excepting the ones that use Apple's supplied bezier points) appear to be tangent but not curvature continuous. As someone with the utmost respect for the learning amateur I would like to kindly inform you that having G1 corners from just hitting "fillet" is the #1 way for design cognoscenti to ascertain that a model was built by an engineer. Alternatively you could try to mimic or offset the G2 curves Apple already paid a bazillion dollars to fine tune.**
* this particular industrial designer x mechanical engineer does not use Shapr but I do see G2 / curvature continuous fillet tools exist via their support page.
** this designer also thinks Apple's and Dieter's corners are too squashed square and has been building devices with slightly sharper and more accelerated corner curvature as the world's natural bends are parabolic or catenary. So roll your own and find your aesthetic voice!*
Interesting you said that, but I used G2 almost everywhere, except in the inner holes of the phone part. If you share a picture, I can happily show the Sharp3D equivalent. Maybe the G2 curvature wasn't as aggressive as it should be?
Huh, well apologies for the assumption though I merely have the blog images to go off. When I look at the render that shows the top ortho and the one for the bottom cable geometry the highlights end fairly abruptly. The only curve that visually looks C2/G2 to me is the acute angle blend between the tray edge and the back of the phone cradle, that has a nice acceleration of the radius in and out of the transition.
It's possible the Shapr rendering engine is not very subtle, or perhaps the G2 math is accurate in a strict sense but the output is not very differentiated from G1. It's mathematically possible for there to be a continual change in local radius, i.e. be curvature continuous, while still having local changes be sufficiently aggressive that it visually appears discontinuous at a human scale. Each CAD kernel seems to make these things in its own way, hence different industrial design studios will strongly prefer the use of certain 3D CAD programs to make their final master models (e.g. Alias). Personally I drive CREO as for ages most manufacturers overseas used pirated copies of Pro/E or CREO and thus I could send them "native" surfaces. In that program my preferred curvature continuous coefficient range was 0.52-0.57. I don't have Shapr access handy so messing around with the coefficients and finding a result that you like is outside my domain -- and perhaps you already did!
Still, all that is on the modeling side, but the best way to actually check the visual smoothness of your corners is to use analysis tools like curvature combs to check how aggressively the model is making transitions. It doesn't fundamentally matter if you use the built-in automatic tools or manually adjust b-splines in your NURBS: the smoother your combs change the smoother your corners will look. [I checked the support page for Shapr to see if it supports curvature comb analysis and saw nothing about it, so you may be out of luck on that front until future updates.] Absent that you have to just spin the model in CAD and see how smoothly the highlights roll around and hope the built-in rendering engine is doing its job well.
One last item of subjective crit in sculpting smooth models: when applying a fillet to an edge that turns a corner, such as your interior pocket, you'll have a less visually cramped and abrupt appearance if you use a fillet chord (edge radius) that's nontrivially smaller than the chord length of the turn it has to make (corner radius). Maximized fillets that come to hard corners and make a full spherical bubble, e.g. your initial models shown in gray, generally look less natural than those that allow the fillet to turn the corner. This lets the highlight work its way around in a racetrack form instead of getting "stuck" in the extremes.
Nice work dude, I wouldn't comment if it didn't seem like you're dedicated to making continual improvement and learning new tricks.
Thank you for the comment. I learned a lot from you and will look into these. Are there any resources I could use to learn more about these, especially sculpting smooth models?
Quite welcome! Sadly I don't know of any resources that are really useful when you try to put things into practice. Most of the tutorials / blogs / forum posts I've seen are not really that constructive nor sufficiently detailed to get into the truly useful practicalities. I personally learned the trade by (a) working in an industrial design studio as the token engineer & CAD jockey with "real" industrial designers pushing me to do better, and then (b) building my own kilohours of practice in aesthetically driven CAD modeling. Now as the design lead & manager on most projects it still takes me months of coaching my employees on subtleties to get things right, and even each project still requires an unreasonable amount of time tuning curves and corners. Like all professional practices this rabbit hole goes real deep. Still, you can get pretty far with brute force iteration and careful attention to detail. I think your progress thus far demonstrates that quite well.
Yeap, so I added the instructions on Gumroad's page (where you download the 3D file). I printed it where the bottom is touching the plate. And support is minimal supporting the tilted part of the model.
I might upgrade soon anyway but is there something preventing iPhone 13 Pro to not fit? I'm not aware of any changes between that one and 14, 15 and 16.
My 13Pro only displays the clock for ~30 seconds before turning the screen off (when I do the turn it sideways while charging thing, "Standby mode" I think its called?)
Actually probably not. Does it have the same size as the 14 Pro ? If it's the same you can use it with no issues. All the orange photos you see are from an 14 Pro, so it should work nicely.